Fans Lighting Company Limited
Website:www.fanslighting.com
Mail:sales@fanslighting.com
Address:No.1 Nanlong Road, Nanlian Community, Longgang District, Shenzhen 518116 China
- 作者: admin
- 来源:
- 日期: 2015-05-23
- 浏览次数: 8010次
This article will give an introduction to installation for LED tube power supply in details.
There are two modes of connection for LED tube power supply installation: single-end power input, two-end power input. Here are the steps:
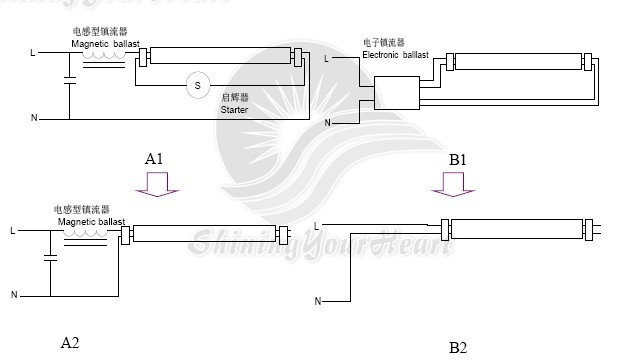
Two-end power input Installation:
LED Tube Light Wiring Diagram
Installation Instruction
1) Turn off the electricity supply before installation
2) For refitting old fluorescent lamp, with a two-end power-input LED tube, please re-connect your wire as the following diagram.
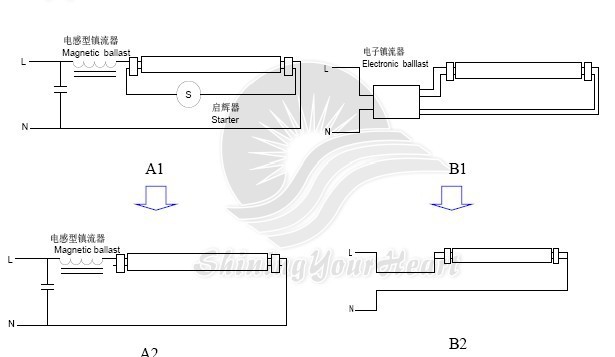
3) For diagram A1 loop with inductive ballast & starter, after removing the starter, LED
tube can be installed directly into the G13 base. Then LED tube light is ready to work. And the loop has been changed from A1 to A2.
Note: You can just keep the inductive ballast as it was. However, it’ll consumer some power. For saving energy, it’s still suggested to cut it out if your labor cost is not so high.
4) For diagram B1 loop with electronic ballast , please remove the electronic ballast firs.Then connect L and N to the two sockets of the G13 base separately. Now your LED tube light is ready to be turned on. And the loop has been changed into the one showed in diagram B2.
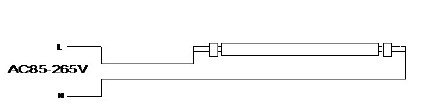
Single-end Power Input Installation:
LED Tube Light Wiring Diagram

Installation instructions
1) Turn off the electricity supply before installation .
2) For refitting old fluorescent lamp with a single-end power input LED tube, please re-connect your wire as the following diagram.
3)For diagram A1 loop with magnetic ballast & starter, please remove the starter first.Then connect line N and Line L to the same side socket but separately. Now you can put on the LED tube and turn it on. And the loop has been changed into the one as showed in diagram A2.
Note: You can just keep magnetic ballast as it was. However, it’ll consumer some power. For saving energy, it’s still suggested to remove it if your labor cost is not so high.
5) For diagram B1 loop with electronic ballast, please remove the electronic ballast first. Then connect line N and Line L to the same side socket but separately. Now your LED tube light is ready to work. And the loop has been changed into what showed in diagram B2.
Copyright © Fans Lighting Company Limited
No.1 Nanlong Road, Nanlian Community, Longgang District, Shenzhen 518116 China URL:www.fanslighting.com